Managing Assets & Machinery

Asset Register


If a business harnesses important physical assets, keeping track of these over time quickly becomes essential.

Whether it’s your own machinery, or a piece of equipment you maintain for a client, attributing costs to these accurately is an key part of your business financial planning – and helps you make smarter decisions about future investment.

SQLWorks supports this process with a dedicated asset register – allowing the user to save a range of information (including make, model, warranty and more) for both in-house and client assets to aid day-to-day business operations. Asset Register can be found in the Stock Ledger, and helps the user build a centralised and definitive list that can be controlled with permissions groups, like any other SQLWorks Ledger.

For in-house assets, SQLWorks users can also link these assets to Purchase Orders – ensuring that asset’s data contains a detailed maintenance history that includes financials.

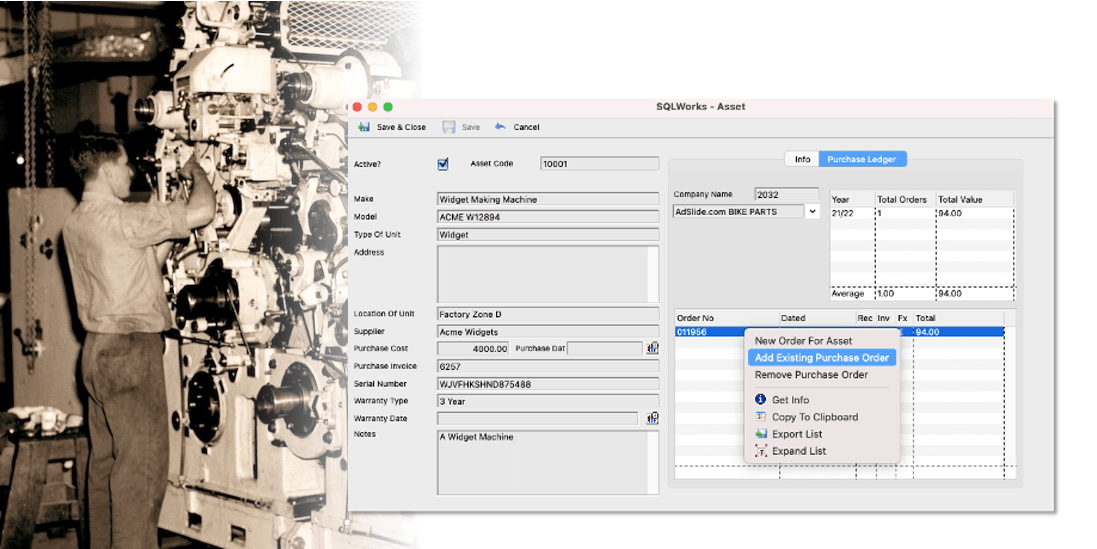
Helpfully, this also works across multiple Purchase Ledger suppliers, so that maintenance costs (such as repairs or replacement parts) remain accurate even if an asset’s service contract changes hands. This helps a company stay flexible, since accounting and contract periods may be much shorter than machinery lifecycles.

Assets may also be optionally enabled as a special tab in a customer’s Sales Ledger account – ensuring a service engineer can easily access known information about a client’s asset as a part of routine account maintenance. This might include location, serial numbering for identification, or notes on past repair work.

SQLWorks ensures business managers can properly document and maintain a full asset register – itself an asset to a well-informed team.


For expertise and software assistance, please contact our SQLWorks Team today

Did you know? SQLWorks Cloud Link

SQLWorks includes a useful ‘drag and drop’ facility for saving documents against projects, sales leads, accounting records and more.

If your organisation stores files in a cloud storage app, SQLWorks can be integrated directly to view these folders in your ‘Documents’ tab, and files can be dragged and dropped into SQLWorks directly from the cloud.

This option can be set up from the main Navigation bar via Preferences > User Preferences > (User) > and by clicking the Setup Tab. By saving the file-path of your cloud app’s desktop folder into the ‘Remote/ Cloud Folder Path’ field, and clicking ‘Save & Close’, a SQLWorks user’s document tree will automatically default to view the chosen file location.

sqlworks cloud link filepath

As long as your cloud app on your PC/Mac is able to sync to the cloud, SQLWorks will be able to make most up-to-date version of your synced files available for drag and drop.

document management

This can be a useful way to make documents collected during fieldwork (eg: photographs) available to a main office – syncing direct from a smartphone, via your cloud app of choice, to be dragged and dropped against projects in SQLWorks.

Options include Microsoft OneDrive, Google Drive, Apple iCloud and Dropbox, as well as many other cloud file storage applications with a read/write access ‘desktop folder’ style client. (If you’re using a lesser-known cloud storage service with SQLWorks cloud link – we’d like to hear about it!)

This tool can also be used with a valid filepath to a location on a traditional on-premise server, and may be useful for businesses with very complex file structures, to help users automatically find the file location they would normally use for managing documents.

SQLWorks cloud link helps leverage all the flexibility of your favourite cloud app, to gather important files into your CRM, accounting and stock control system.

For additional support and assistance, please contact our SQLWorks team today.

Did you Know? Quoting Tips

quoting tips

Quoting a customer can be a delicate process, and sometimes you need to be able to issue a quote with detailed options. We’ve collated a few handy tips to help your sales team build the perfect SQLWorks quote.

If you’re putting together a more complex quote, it can sometimes be useful to give a customer options. You can create these by right-clicking on the line numbers on the left of each quote line, and selecting ‘Choose Option Group’ to place groups of lines under ‘Option 1’ ‘Option 2’ subheadings (1.)

These options are normally alternatives to each other, so you typically won’t want SQLWorks to total them together. You can remove the overall total by switching to the to ‘Extras and Project’ Tab in the top right of the quote header, and unchecking the ‘Print Totals’ checkbox (2.) This will remove the ‘grand total’ from the bottom of the normal quote template (please note that if you exclude VAT you’ll need to include an amendment to this effect, as depending on your settings, the total VAT may no longer be visible.)

If you need to include sub-total lines instead for each option group, the easiest way is to add a sub-total line at the end of each group. By right clicking on the grey background of any given line, you can choose ‘Toggle Line Type’ to change a line to display the sub-total of the group immediately above it, to be hidden or to become a comment line without any costs (3.)

The area around the line number will change to a different colour to reflect the line type (1), and the quote template will change to incorporate the new line type. This is useful to help keep your quote clear and tidy – to add a running sub-total, line gaps or comments.

With these extras it’s easy to build more complex quotes from SQLWorks, and give customers an informative choice.

A Quick Disclaimer: if you have a custom quotations window for your company/organisation, one or more of these quoting tips features may be disabled. If you need them – speak to the SQLWorks team!

Fact Sheet: Sales Leads

sales leads

Need to manage a sales leads pipeline for your business? SQLWorks CRM includes a comprehensive sales leads module which can help you manage your customer outreach.

Leads can be accessed within the CRM section of the main navbar (1.) and will load a table of leads with multiple coloured panels representing your sales stages (2.)

You can double click on a lead to open it, reorder your leads by clicking the column headers or click the ‘Q1’ ‘Q2’ ‘Q3 ‘Q4’ buttons along the top toolbar to filter by financial quarter.

Once a lead has been opened, you can record common sales qualification data including priority level, log a lead source, assign categorisation and note the contact details of your contact in the top half of the edit Lead window (3.) You can also give each lead speculative value, profit and conversion chance, and set a follow up date for further action which can display in the SQLWorks diary. In the lower panel (4) are your normal SQLWorks CRM tools – you can link phone logs, emails, tasks and drag in documents to be saved against your lead, and save a record of actions performed to progress the lead with a time/date.

By clicking the [+] button above the lead stages you can unlock each new lead stage – moving your lead down the sales pipeline.

As leads move through your pipeline, your brightly coloured lead stages in the main screen (2) display how many leads are active at that stage, what the total value of these are in turnover, and the total likely profit (calculated by multiplying each lead’s percentage by it’s turnover value and adding the sum of that stages leads these together.) You can load the leads active at any single stage by clicking on that stage, and the stages themselves can be set to match your own sales pipeline. ‘Receipted’ and ‘Lost’ sales leads will always default their quantity to 100% of value converted or lost, and will move a lead to ‘Closed.’ By clicking the ‘Load Open’ button in the top toolbar you can filter your list to exclude these closed leads, and just work on those that are active.

If you need a quick way to record new enquiries over the phone, you can create a new lead when making a new phone log by clicking the ‘leads’ tab in the new phone log screen. To save time, the details of your new lead will be automatically populated from those you recorded in the phone log.

Your leads are kept isolated from your main companies list to prevent bigger sales departments with large numbers of cold contacts swamping your SQLWorks Sales Ledger with non-customers.

At any time however, (for example when a Lead becomes a customer) you can click the ‘Conversion Tab’ in the lower half of the edit lead window to automatically save the company details gathered by your Sales agent as a new company in your main SQLWorks companies list.

In this way SQLWorks makes it simple to log new leads, record progress in detail between multiple sales staff, and estimate future conversion rates.

For CRM guidance and help: contact us today.

Team SQLWorks at EurOmnis 2016

EurOmnis

Our SQLWorks team recently exhibited at the 2016 EuroOmnis developers conference in Tuscany, Italy – joining Omnis developers conference from more than a dozen countries around the globe.

EurOmnis is an annual educational event designed to bring Omnis programmers together to share knowledge and to showcase the very latest in software development.

“Lineal have been part of, and latterly helped organise, this international conference of Omnis developers since 1999” explained Managing Director Mike Matthews. “As a member of the Omnis developers group (ODEV), our SQLWorks Business Management Software undergoes an ongoing process of learning and development – and we’re always looking at what features future versions of SQLWorks will need to stay at the forefront.”

“The best businesses are always looking to the latest technology for an extra edge, so both our team and SQLWorks software need to be just as agile.”

EurOmnis

Attendees enjoyed classes, discussions and more surrounding the latest advances in Omnis software development, including javascript web tools, responsive graphs and visualisation aids, and Omnis development for portable devices such as smartphones and tablets.

Representatives from Omnis were also present, to host seminars informing and updating attendees on the platform’s latest news, as well as explore likely developments in the near future and gather feedback.

EurOmnis

The conference also gives developers a chance to showcase what they have been working on to other developers, drawing on software projects undertaken across countless industries and sectors.

To learn more about SQLWorks: contact us today.

Did you know? Task Prioritisation

task prioritisation

SQLWorks’ task list can prioritise your tasks in order of important with a simple colour-coding system: here’s how to use this.

When creating or editing a task, you can choose a priority level from the ‘Priority’ dropdown menu, which by default contains 3 levels. After saving the task with a task prioritisation:

All ‘Normal’ Tasks go in the main (grey) default task window. You can use the main task list as a to-do list for today’s tasks, filtering the list, sending reminders and closing jobs as they are completed. Your SQLWorks admin can also be given control over closing tasks, and recording the time taken to finish each job.

All ‘Low’ priority Tasks go to the green task panel on the left hand side – you can use this to hold tasks that are not important, or have no imminent deadlines.

All ‘High’ priority tasks go to the red task panel on the left hand side – you should reserve this list for only the most urgent tasks. When a new task enters this list, SQLWorks will also email the person who this task is assigned to, letting them know they have a very urgent task to complete.

The yellow task panel is an especially useful area, reserved for ‘Future tasks that are dated ahead of time. You can do this by post-dating the ‘Open Date’ on a task before saving it. Your future tasks will remain in the yellow list until the ‘Open Date’ (and time) passes – at which point your task will be moved by SQLWorks to your main grey list to be worked on.

This is a handy tool for keeping tomorrow’s work clear from today’s to-do list, and populating tomorrow’s to-do list automatically when tomorrow arrives.

For a professional CRM solution on either Windows or Mac, contact us today.

Fact Sheet: Adding Emails

Adding emails

SQLWorks integrates with your email inbox to let you view, send and use emails to complete other tasks: here’s how.

To add your email account to SQLWorks, click ‘User Prefs’ under Preferences (1) in the main navbar. Select your User ID, and under the ‘Employee Info’ Tab put your email settings into email settings fields, including your account ID and password. This will give SQLWorks permission to see the contents of your email inbox.

In the main Companies List (1) by clicking the ‘Emails’ Tab (2) under a selected company’s record you can view the contents of your inbox on the left hand panel, and emails saved within SQLWorks on the right hand panel.

Dragging an email from the left panel to the right panel saves a copy to the system and makes the email visible to other SQLWorks users, whilst selecting an email makes the message content visible in the yellow viewing box below.

This is most useful for adding emails which are to valuable to just sit in your inbox – emails which your team will need to be able to share or recover details from in your absence.

You can also use this tool to place important emails within the system, linking important correspondence to projects, sales leads, quotations and more.


SQLWorks can even be configured to recognise significant emails and automatically add them to projects and other areas – for additional information, ask the SQLWorks team today.

Did you know? Bulk Invoicing

bulk invoicing

Bigger businesses can find it useful to send out invoices in batches (‘bulk invoicing’) – here’s how to do that in SQLWorks.

Click the ‘Reports’ button in the top right hand corner of your Sales Ledger and select the ‘Unprinted Invoices’ option. This loads a new window displaying any invoices which haven’t yet been submitted to a customer for payment.

You can select individual or multiple invoices (or choose a range of invoices by invoice number) and send these automatically by clicking the ‘Print/Email’ button.

Whether your invoices are printed, emailed or both can be set for each company in the Sales Ledger under the ‘Print & Orders’ Tab –  under Default Print Settings you can choose how to send invoices to that client, and set an invoicing contact email for that company.

This same tool can also be used for automatically sending statements to customers in your Sales Ledger, by entering a contact email address for statements and choosing a format for sending.

In addition, you can set SQLWorks to send Sales Ledger Statements based on amount – choose ‘No’ to never send this customer  a statement, ‘Yes’ to send if the customer has an outstanding balance, and ‘Always’ to always send a statement regardless of outstanding credit.

Both the automatic sending of invoices and statements in SQLWorks, in bulk, allows you to easily get through larger volumes of customer billing.


For support and advice, please contact our SQLWorks team today – 01271 375999.

Fact Sheet: Quoting

Fact Sheet Quoting

SQLWorks Accounts includes a line by line quoting tool which allows you to build custom sales quotes.

Quoting can be accessed from a company’s sales account within your SQLWorks Sales Ledger (1) in the main Navigation bar under the ‘Quotes’ Tab. Here your quotes for the selected company are listed in date order, with details of lines inside the quote previewed in the table below.

Create a new quote by clicking the ‘New Quote’ (2) button, which opens the quoting window. The details of the selected company are listed at the top of the quoting window (3), with the first line of the quote listed in the panel below. You can populate your quote with extra lines by right clicking this panel and clicking ‘Add new Line’, change the order in which lines appear or make amendments.

If using SQLWorks Stock, saved stock items can be quoted for from the dropdown list on the left of each quote line, or type in the free form text box to add custom items such a labour or other extra costs. If your stock items have default costs saved, these are automatically entered as the RRP, unless you specify different amounts and margins.

SQLWorks allows you to add multiple quote ‘options’ by right clicking the digit on the far left of each line, assigning each quoted item to a group. This is useful for putting quote options; ‘Option 1’, ‘Option 2’ etc. for a potential customer to choose between.

The command buttons at the top of each quote allow you to ‘Preview’ or ‘Print’ a quote for sending, ‘Halt’ a quote into your ‘Halted Items’ for further work later, ‘Save & Close’ the quote as it stands or ‘Cancel’ your changes.

Right clicking a quote opens up options for using that quote, including printing, emailing, duplicating or splitting a quote. By duplicating a quote you can work with multiple saved revisions, and splitting a quote allows SQLWorks to cross-check a quote against your Stock Ledger, fulfilling and order based only on what you currently have in stock.

Once your quote has been printed or emailed out to a customer, that quote is locked to everyone but your company’s SQLWorks administrator, exactly as the customer received it.

Your quotes will be made into to a formal PDF format which includes your company details and logo, and is designed by the SQLWorks team to match the formats of your existing company documentation and letterheads.

If your quote has been accepted, right-clicking and selecting ‘Send Quote to Order’ (or ‘Send Quote to Invoice’) will then move your quote on to the next stage of the sales process without the need to re-key any of the line items.


Contact Lineal today for more information on SQLWorks quoting: 01271 375999

Fact Sheet: Credit Control

SQLWorks Accounts allows users to control both credit limits for each company they sell to, and credit hold settings for their customers overall.

Each company’s credit limit can be found in their company information by selecting them from the list of companies with sales accounts in the Sales Ledger (1). Clicking ‘Edit’ from the top toolbar unlocks the company information for editing, and users can simply enter a chosen Credit Limit (2), before clicking ‘Save.’

Within Accounts Preferences, users can set a standard ‘Value for Credit Limit’ to apply to each new company by default. You can also change your ‘Credit Hold’ type for what happens when companies exceed their limit, chosen from one of four possible settings:

  • Manual – Where the user must check if companies have exceeded their credit limit, and choose who to place on hold or not. An utility can be run at any time to review current sales accounts.
  • Manual with Override – As above, but if a company is on hold, SQLWorks will prompt the user with notifications so that the user must choose whether to continue with the action or not.
  • Automatic – SQLWorks will place companies on hold or not, based on their credit limit and overdue invoices.
  • Automatic with Override – As above, but the user can be override this and choose to extend further credit if they choose.

If on ‘Automatic’ SQLWorks will also move companies with overdue invoices onto hold, but users can specify a number of ‘days grace’ to give customers under the ‘Sales’ Tab within ‘Accounts Prefs. Company’s automatically placed on hold will also have their orders placed on hold, unless overriden manually.

If using manual credit control, users can right click the list window in the Sales Ledger and launch the ‘Credit Control’ utility – here you can review your companies manually based on four criteria: ‘Days grace’ given for overdue invoices, ‘Put Accounts on Hold’ or ‘Take Accounts off Hold’ to add or remove holds respectively, ‘Include Outstanding Order as Part of the Credit Limit’ to include orders placed but not invoiced on a company’s credit limit.

The manual ‘Credit Control’ utility then generates a list of those companies which are on hold (but are now within agreed credit terms) or not on hold (but have exceeded their credit terms). The user must choose who to place on hold or remove from hold, based on their credit limit and ‘days grace’ for payment deadlines. You can remove companies from the list by selecting lines and clicking the ‘Filter’ Button.

If using automatic credit control, this filtering process is controlled by SQLWorks unless you choose to override a hold. Whether to use Manual or Automatic depends on your own businesses’ level of credit control.

By default, SQLWorks will always automatically hold orders for companies that have exceeded their credit limit, and (if you also use SQLWorks Stock) will not allocate stock to that customer.

For account managers, a useful tool can be to set a chosen company’s credit limit within SQLWorks to ‘0’ (always on hold) or set a highly trusted company’s credit limit to ‘-1’ (never on hold.)

In this way SQLWorks ensures you always have control over how much credit your business extends, and to which clients.

Please contact our team for more information about SQLWorks and managing sales accounts.